Most people know that you can build muscle at the gym. Luckily there are also exercises you can use to train your lower chest muscles at home.
For most of these lower chest exercises, you would benefit from having fitness equipment like dumbbells, kettlebells, or resistance bands. That being said, you can also do a good amount of them with objects you can find in most households and even a few without equipment.
Even if you don’t have typical fitness “weights” objects like a backpack with heavy things in it and a grocery bag can work great to make some of these lower chest exercises weighted at home. This can in turn lead to more and faster lower chest muscle gain compared to just using your body weight.
Keep in mind that even though there are upsides, your injury risk is generally also higher when you do exercises with more weight/resistance. You may want to talk to your primary care provider before starting a new workout routine.
These exercises may look like regular chest exercises at first but by making small changes you shift what part of the chest muscles you focus on.
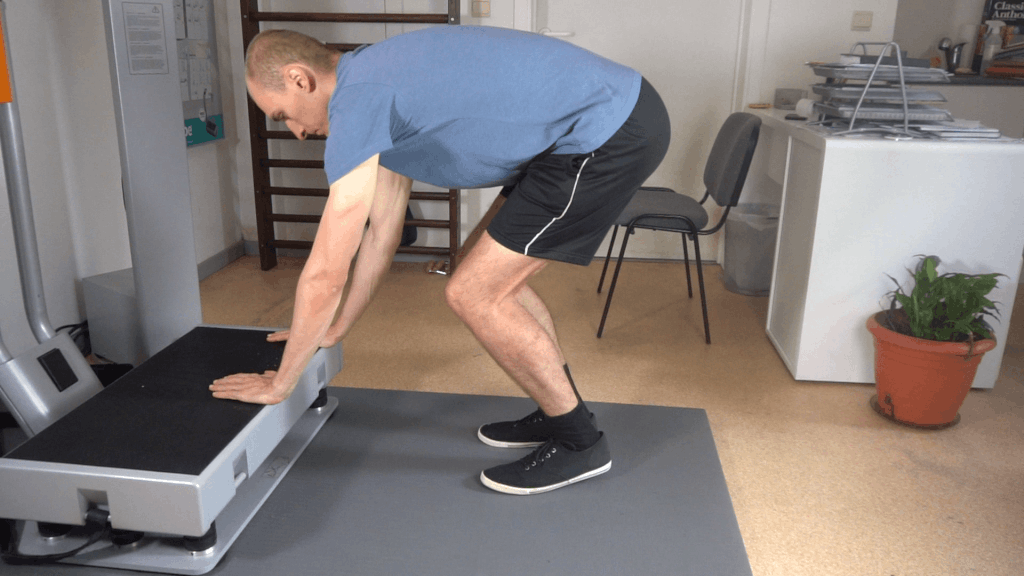
1. Incline pushups
Pushups are a popular bodyweight compound exercise that can be used to train your chest muscles. By changing the angle of a regular pushup you can change what parts of the chest muscle get engaged more.
By doing an incline pushup you focus more on your lower chest muscles. To do one you need an elevated place to put your hands. After that to do an incline pushup take the following steps:
- Put your hands about shoulder-width apart on the elevated platform. Your arms start stretched.
- Move your feet back until your body is in a straight line and your arms are at a 90-degree angle to your body.
- Slowly fold your arms at your elbows until your face is close to the platform. Your upper arms should be at an angle of about 45 degrees to your sides. Another way to put it is if someone is looking down at you from above your arms should make an arrow, not a T.
- Stretch your arms again until you are back in the position from the second step.
Incline pushups are easier to do than regular pushups since less of your body weight rests on your arms, wrists, and shoulders. The more incline you go, the higher you place your hands, the easier the pushups become.
In some cases, this can be an advantage. Even so, when trying to build a lot of muscle you likely want more resistance.
One way to solve this is by adding resistance to your incline pushups for example by wearing a good weighted vest or using resistance bands.
2. Lower chest dips
The dip exercise can help you train your triceps if you keep your body straight, but also your lower chest if you tilt your upper body forward.
This exercise is generally done with dip bars but if you don’t have these at home you can use chairs or a bench. These will be less challenging than the dip bar version since part of your body weight rests on the ground. To do a chair dip take the following steps:
- Find 2 stable chairs. A stable bench or another elevated platform can also do the job.
- Place your hands at more or less shoulder-width apart on the surface with stretched arms. Your feet should rest stably on the ground.
- Bend your arms at your elbows until they are at a 90-degree angle. The rest of your body should barely not touch the surface and your upper body should slightly tilt forward. Try to put as much weight on your arms as possible, your legs should be used as balance, not to move you.
- Raise yourself back up into starting position.
To compensate for part of the resistance loss by doing a chair dip, you can make the dip more weighted with for example a weighted vest or simply a heavy backpack on your chest.
3. Decline chest press
The chest press is one of the most popular weight lifting compound exercises for growing chest muscles. Similar to the pushup you can do the chest press at a different angle so that you focus more on your lower chest muscles.
A decline weight bench and some type of resistance like dumbbells or resistance bands can be helpful.
That being said you can also create your own decline on the ground and use a heavy compact household object as extra weight. To do a decline press on the ground with dumbbells take the following steps:
- Lie with your back on the ground, feet flat on the ground so that your lower legs are vertical, with a dumbbell at each side.
- Pick up the dumbbells and move into a position where the dumbbells are about shoulder-width apart at about chest height. You should have an overhanded grip which means your palms are facing toward your feet. Your arms should be at an angle of about 45 degrees to your sides.
- Push up your butt until you are in one straight line from your knees to your shoulders.
- Slowly push up the dumbbells straight in the air until your arms are slightly less than extended.
- Lower the dumbbells in a controlled motion into the position of step 3.
Using a FID bench (flat, incline, decline) for this exercise does allow a bigger range of motion and more retracting of your shoulder blades which can lead to reduced injury risk.
Doing this exercise on a bench is also generally more comfortable than on the ground. In any case, the decline chest press can be helpful for training your lower chest muscles at home.
4. Dumbbell pullover
For the dumbbell pullover you preferably want a dumbbell and a flat weight bench. Similar weights and a similar surface to lie on can work too. Once you have these, take the following steps to do a dumbbell pullover:
- Lie on a weight bench with your head on the end of the bench. Hold a dumbbell on your chest.
- Grab one end of the dumbbell with both of your hands with your hand palms pointing upward. Extend your arms upward until they are slightly less than stretched and point them up.
- Slowly move back your arms as far as comfortable. Keep your elbows close to the center, not pointing outward. Your arms stay slightly less than stretched throughout the exercise.
- Move your arms back to the position in step 3 in a controlled motion.
Dumbbells are a great piece of fitness equipment but not everyone has them. Resistance bands are also a great alternative for this exercise that requires a lower investment.
If you feel dumbbell pullovers in your back instead of your chest, you likely have to switch up your technique. Make sure you keep your elbows close to the center throughout the movement.
5. Decline chest fly
Similar to the chest press, the chest fly is a relatively standard chest exercise. By changing the upward angle in relation to your body you engage your lower chest muscles more compared to the regular chest fly. To do a decline chest fly on the floor with dumbbells take the following steps:
- Lie with your back on the ground, feet flat on the ground so that your lower legs are vertical, with a dumbbell at each side.
- Pick up the dumbbells and move into a position where your slightly less than stretched arms rest on the ground at about a 90-degree angle to your body. Your hand palms face upward.
- Push up your butt until you are in one straight line from your knees to your shoulders.
- While keeping your arms slightly less than stretched slowly move up the dumbbells until your arms are at a 90-degree angle with the ground.
- Lower the dumbbells in a controlled motion into the position of step 3.
An actual decline bench and dumbbells are helpful but you can also easily do a decline chest fly at home without any special equipment.
6. Jackhammer pushdown
For the jackhammer pushdown you will need resistance bands and a way to anchor them somewhere at about shoulder height or higher. Once you have these to do a jackhammer pushdown take the following steps:
- Anchor a resistance band somewhere at about shoulder height or higher.
- Stand next to the anchor, tilt your body slightly forward while keeping your back straight, and grab the resistance band with both of your hands. Your hand palms should face downward. In starting position you want your hands at about shoulder height.
- Push down the resistance band until your arms are slightly less than stretched.
Not many pieces of fitness equipment allow you to do this exercise. Besides resistance bands, you could also use a cable machine but not many people have one of these at home.
7. Resistance band crossover
For the resistance band crossover exercise, you will need to attach two resistance bands far enough away from each other at about shoulder height.
After that to do a resistance band crossover take the following steps:
- Attach each resistance band on a suited anchor at about shoulder height.
- Grab 1 resistance band, walk towards the other resistance band and grab it with the other hand. Stand in the middle between the two anchors.
- Put one foot a small distance backward and the other foot forward for balance. Slightly tilt your upper body forward while keeping your back straight. Keep your arms slightly less than extended and horizontal throughout the exercise.
- Slowly bring your hands to the center, instead of stopping when right before they touch each other you let one arm go above the other to go a little further.
- Slowly go back to starting position.
- When doing multiple repetitions switch between which arm goes above.
The “standard” version of this exercise is the cable crossover with a cable machine.
It does require a somewhat more complicated setup but you can also do a resistance band crossover to work out your lower chest muscles at home.